Thursday, October 26, 2023

Sitecore Search: How to Configure Textual Relevance for Better Search Results

Sitecore Search : How to Configure Textual Relevance for Better Search Results

Textual relevance in Sitecore Search is determined by how closely a potential result matches the visitor’s search query. To configure textual relevance, you need to specify which content areas Sitecore Search should look for matching terms and the relative importance of each area. This blog is intended to demo on how to configure Textual Relevance on Sitecore Search to aim better search experience for customers. 

  • For example, If the attributes name and description are configured for textual relevance then Sitecore Search looks for matching terms in these attributes. 
  • Multiple attributes can be configured with the textual relevance feature.
  • Each attribute can be give a Weight/Priority in the Global Widget Settings. This weight is used with other factors to determine the order of documents in search results. 
Below are the steps to configure Textual Relevance in Sitecore Search:

To add an attribute and enable it for textual relevance:
  • In the CEC portal, click Administration > Domain Settings. Under Attributes click on Add Attribute at the top right corner.
  • Click Settings > Entity and choose the relevant entity. In the Display Name field, enter a display name for the attribute, e.g. Name
  • In the Attribute Name field, enter the attribute's key e.g. Name. This value is used later in the source configuration

  • On the Use For Features tab, select the Textual relevance option. Click Save and then, click Publish

The next step is to configure textual relevance at the domain level

  • In the CEC portal, click Administration > Domain Setting > Feature Configuration.
  • Click Textual Relevance > Add Attribute.
  • On the field where textual relevance needs to be added, click Add Analyzer and then click Add.
  • By default, the analyzer Multi-Locale Standard Analyzer is already set on the attribute but as per the requirement it can be selected from the list available. Click Save and Publish. 


The next step is to enable the new attribute for Textual Relevance in the Global Widget 
  • In the CEC, click Global Resources > Global Widget > Global Widget Settings > Textual Relevance. Click Advanced Mode.
  • Here weightage can be assigned numeric values for different attribute/analyzer combinations. 
  • To include an attribute, click Include.
  • In the WEIGHT column, assign a weight to the attribute, e.g. enter 2 for Name and 1 for Description.
  • Click Save and Publish.

By setting up the attributes for textual relevance, all you need to do is to run the rescan and re-index and check if the search results have updated and better potential results are shown to the search query.

Thursday, October 12, 2023

Troubleshooting Sitecore Search Crawling Failures: A Step-by-Step Guide

Troubleshooting Sitecore Search Crawling Failures: A Step-by-Step Guide

Sitecore Search offers the following pull sources:

  • Web crawler - a tool that crawls your content by starting from a point and following hyperlinks. 

  • Advanced web crawler - a powerful and highly customizable crawler that crawls your content and adds it to an index. 

  • API crawler - a crawler specifically designed to crawl API endpoints that return JSON. 

Sitecore Search crawls the website to extract the latest content using the trigger setup, usually it is sitemap.xml. There could be multiple reasons why the crawling might start to fail and index may not get the latest content from the website due to that. This blog is intended to demo on various reasons of why the crawling may fail, and how to resolve these issues.


Below are some potential options that you can try to remediate the issue faster:

  • This issue may arise when the system attempts to parse your source and finds it not in the correct expected format. 
    • For example, if the source is sitemap.xml and if it does not render in the correct XML format, the crawling will fail. 
    • To prevent this, please ensure that your sitemap (https://site.com/sitemap.xml) is always formatted correctly.
  • Rerun the crawling and the index and check if it is progressing to completion. Navigate to the Sources link on the CEC, and then find the source and click on the "Recrawl and reindex" link.  
  •  
  • There could be an issue with the Sitecore Search platform itself so please reach out to Sitecore Support via a ticket. 
    • We recently faced an issue with Sitecore Search where the Sitecore Search crawling started to fail intermittently giving the error "Job failed due to heartbeat error". Sitecore Support did confirm there was an issue going on with the heartbeat error, and they immediately launched a new version with the fix immediately. 
  • There could be a recent change implemented by an admin or developer before the crawling started failing. If the scripts on the document extractors start throwing errors, then there will be an impact on the crawling job. 
    • One option is to undo the recent change and see if the issue get fixed and the crawling is successful again. 
    • Further troubleshooting may be required with the changes on the scripts for the document extractors.


Thursday, August 31, 2023

Sitecore PowerShell Extensions: Creating Sitecore users in bulk using SPE

Sitecore PowerShell Extensions: Creating Sitecore users in bulk using SPE

This blog is intended to demo on how to create multiple users and assign them the required roles through automation by the use of Sitecore PowerShell Extensions. If there is a requirement to create multiple users in Sitecore and assign them individual Roles, it can take a while to do it manually one by one. Instead, we can configure the user creation and role assignment using a script in Sitecore PowerShell Extensions. 


Here is an example which explains how multiple users have been created into Sitecore. Reference to the Sitecore documentation : https://doc.sitecorepowershell.com/appendix/security/new-user

New-User -Identity usrA -Enabled -Password b -Email usrA@gmail.com -FullName "User A"
New-User -Identity usrB -Enabled -Password b -Email usrB@gmail.com -FullName "User B"
New-User -Identity usrC -Enabled -Password b -Email usrC@gmail.com -FullName "User C"

Once these users are created, the below step is to add the users into their respective roles. Below is the command to add the individual users into the Roles. 

Add-RoleMember -Identity "Developer" -Members "usrA", "usrC"
Add-RoleMember -Identity "Publisher" -Members "usrB"

Reference to the Sitecore documentation : https://doc.sitecorepowershell.com/appendix/security/new-userhttps://doc.sitecorepowershell.com/appendix/security/add-rolemember

Hope this article helps to create users in bulk and can save lot of manual efforts. 


Monday, August 7, 2023

Allowing PDF file redirects on the Sitecore website

Allowing PDF file redirects on the Sitecore website

As per the Standard Sitecore setup, the PDF redirects are not allowed or handled via Sitecore. This blog is intended to demo the use case to allow redirects of PDF files.

In order to give the freedom to Content Authors, so that they can setup these PDF redirects, the PDF extension is required to be allowed in the below processor FilterUrlFilesAndExtensions

Below is the configuration required for a SXA website:

<sitecore>
  <pipelines>
    <preprocessRequest>
      <processor type="Sitecore.XA.Foundation.SitecoreExtensions.Pipelines.PreprocessRequest.FilterUrlFilesAndExtensions, Sitecore.XA.Foundation.SitecoreExtensions">
        <param desc="Allowed extensions (comma separated)">aspx, ashx, asmx, pdf</param>
      </processor>
    </preprocessRequest>
  </pipelines>
</sitecore>


After making the above change, the URL https://sc102.dev.local/dummypage/dummy.pdf gets redirected successfully to https://sc102.dev.local/home

Below is the configuration required for a normal Sitecore website without SXA module:

<sitecore>
<pipelines>
<preprocessRequest>
<processor type="Sitecore.Pipelines.PreprocessRequest.FilterUrlExtensions, Sitecore.Kernel">
<param desc="Allowed extensions (comma separated)">aspx, ashx, asmx, pdf</param>
</processor>
</preprocessRequest>
</pipelines>

Sunday, August 6, 2023

Issue with Sitecore CleanUpAgent resulting in low disk space on Sitecore servers

Issue with Sitecore CleanupAgent resulting in low disk space on Sitecore servers

This blog is intended to demo the resolution of the issue with Cleanup Agent, due to which the old log files are not cleaned up automatically by the agent, resulting in low disk space on the Sitecore servers. 

In multiple versions of Sitecore, there is a bug in the CleanupAgent that the task executes but leaves behind so many log files. Usually, due to the rollingStyle mentioned in the Log Appender, for every 10MB, it creates log files with name ending with a suffix number like azure.log.xxxx.txt.1, azure.log.xxxx.txt.2 and so on.

Due to this bug

  • Low disk space on the Sitecore servers
  • Size of the app becomes quite huge
  • Backups will start to fail, and restore of the sites start to fail due to enormous back up size


With an easy fix, this issue can be resolved. With the below pattern, CleanupAgent will definitely pickup the log files ending with the number suffix and the logs folder will reduce to the expected size. 

<configuration xmlns:patch="http://www.sitecore.net/xmlconfig/" xmlns:role="http://www.sitecore.net/xmlconfig/role/"
   xmlns:env="http://www.sitecore.net/xmlconfig/env" xmlns:set="http://www.sitecore.net/xmlconfig/set/">
<sitecore>
<scheduling>
<agent type="Sitecore.Tasks.CleanupAgent">
<files>
<remove folder="$(dataFolder)/logs" set:pattern="*log.*.txt*" />
</files>
</agent>
</scheduling>
</sitecore>
</configuration>

Friday, August 4, 2023

Encrypt Sitecore credentials by securing credentials under App services Configuration


Encrypt Sitecore credentials by securing credentials under App services Configuration

This blog is intended to secure the connection strings of the Sitecore platform as per the recommendations from Sitecore. This is a very important step to secure the credentials, to stop them exposed to unauthorised access.  

By default, the Sitecore passwords are stored in Connectionstrings.config for the different roles. As per the recommendations from Sitecore, they should be encrypted so that passwords are not exposed without authorization. 

For the Core roles and XP Service roles, below is the method that you can use to secure the credentials of the website. 

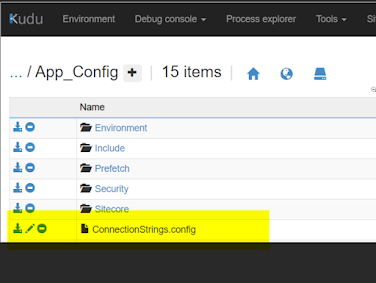
Step 1: For each of the roles, open App service Editor/Advanced Tools and navigate to the file "site/wwwroot/App_Config/ConnectionStrings.config"


Step 2: For each of the connection strings mentioned in the file ConnectionStrings.config, create a new entry under the App service -> Configuration -> scroll down to "Connection Strings" section. For example, core, web, master, security, etc. 

The name of the key will be the same as in the file. And the Value will be the complete "connectionString" value from the file. Type will be SQLAzure for the database ones. 

For other connection strings, you can set them to Custom. 


Step 3: 

Make sure you empty the connectionString value from each of the line items on the file ConnectionStrings.config. App services will fetch the connection strings from the Connection Strings section of the Configuration automatically.


And for the webjobs in the roles, xConnect Search, Cortex Processing and Marketing Operations : Below is the method to move their credentials into Configuration under App services. 

Step 1: For each of the webjobs mentioned above, open App service Editor/Advanced Tools and navigate to the file wwwroot\App_Data\jobs\continuous\xxx\App_Config where xxx is among the folders ProcessingEngine/IndexWorker/AutomationEngine depending on the webjob.


Step 2: Create an App setting by name "SITECORE_CONNECTIONSTRINGS_" as prefix followed by name from ConnectionStrings.config. Please make sure, name should be in Capital letters. 


Step 3:


Make sure you empty the connectionString value from each of the line items on the file ConnectionStrings.config. App services will fetch the connection strings from the Connection Strings section of the Configuration automatically.


Monday, June 26, 2023

Sitecore installation : Failed to start the Marketing Automation Engine service

 Sitecore installation : Failed to start the Marketing Automation Engine service

This blog is intended to demo the resolution of common issues while installing Sitecore at the step where the setup errors out failing to start the Marketing Automation Service. I have experienced this issue while installing multiple versions of Sitecore where the setup starts failing at the step of starting the service Sitecore Marketing Automation Engine.
Sitecore XConnect certificate error – HTTP response was not successful: Forbidden


After digging into the logs of the Marketing Engine job, I was able to identify the root cause of the setup failure.

ERROR Exception when executing agent aggregation/aggregator Exception: Sitecore.XConnect.XdbCollectionUnavailableException Message: The HTTP response was not successful: Forbidden Source: Sitecore.Xdb.Common.Web at Sitecore.Xdb.Common.Web.Synchronous.SynchronousExtensions.SuspendContextLock[TResult](Func`1 taskFactory) at Sitecore.XConnect.Client.XConnectSynchronousExtensions.SuspendContextLock(Func`1 taskFactory) at Sitecore.XConnect.Client.Configuration.SitecoreXConnectClientConfiguration.Initialize(XmlNode configNode) at Sitecore.Configuration.DefaultFactory.CreateObject(XmlNode configNode, String[] parameters, Boolean assert, IFactoryHelper helper) at Sitecore.Configuration.DefaultFactory.CreateObject(XmlNode configNode, String[] parameters, Boolean assert) at Sitecore.Configuration.DefaultFactory.CreateObject(String configPath, String[] parameters, Boolean assert) at Sitecore.XConnect.Client.Configuration.SitecoreXConnectClientConfiguration.GetClient(String clientConfigPath) at Sitecore.Analytics.Aggregation.XConnect.DefaultXdbContextFactory.CreateReadOnly() at Sitecore.Analytics.Processing.AsyncPoolScheduler`2..ctor(IAsyncProcessingPool`1 pool, IXdbContextFactory xdbContextFactory, ExpandOptions options, Int16 maxBatchSize, BaseLog log) at Sitecore.Analytics.Aggregation.InteractionAggregationAgent.<ExecuteCoreAsync>d__15.MoveNext() — End of stack trace from previous location where exception was thrown — at System.Runtime.ExceptionServices.ExceptionDispatchInfo.Throw() at System.Runtime.CompilerServices.TaskAwaiter.HandleNonSuccessAndDebuggerNotification(Task task) at Sitecore.Analytics.Core.Agent.<ExecuteAsync>d__1.MoveNext() — End of stack trace from previous location where exception was thrown — at System.Runtime.ExceptionServices.ExceptionDispatchInfo.Throw() at System.Runtime.CompilerServices.TaskAwaiter.HandleNonSuccessAndDebuggerNotification(Task task) at Sitecore.Analytics.Core.AsyncBackgroundService.<ExecuteAgentAsync>d__22.MoveNext() — End of stack trace from previous location where exception was thrown — at System.Runtime.ExceptionServices.ExceptionDispatchInfo.Throw() at Sitecore.Analytics.Core.AsyncBackgroundService.<RunAsync>d__26.MoveNext()


Here are some of the ways you can fix this issue, depending on the situation.

First way is to identify if there are any non-self-signed certificates in the Trusted root store. Below is the PS script to identify it:
1
Get-Childitem cert:\LocalMachine\root -Recurse | Where-Object {$_.Issuer -ne $_.Subject}
If there are any certificates found after running the previous script, please run the below script to move them to the Intermediate Certification Authorities:

Get-Childitem cert:\LocalMachine\root -Recurse | Where-Object {$_.Issuer -ne $_.Subject} | Move-Item -Destination Cert:\LocalMachine\CA


Another way to fix the above issue is to “Disable TLS 1.3 over TCP”.

To get to the settings,

Open IIS -> Go to the xConnect site-> Click on Bindings -> Open the https binding and check the setting “Disable TLS 1.3 over TCP”.


If still the issue doesn’t get fixed by this, there could be other issues happening. I was able to resolve the issue by fixing the permissions on the relevant folders. Make sure the wwwroot folder/website folder are required


a. IUSR-> Full Access
b. Network Service -> Full Access
c. IIS_IUSERS -> Full Access
d. LOCAL SERVICE -> Full access

You can also grant AppPools access to the wwwroot folder by granting Full Access to the IIS AppPool\xConnectAppPool